

-
Raider Phoenix.
User deleted
"A good fighter must have one outstanding trait - aggressiveness."
Major John T. Godfrey, USAAF
"I never went into the air thinking I would lose."
Commander Randy "Duke" Cunningham, USN
In order to archive victory in air-to-air combat, a pilot must be both aggressive and self-confident. These two traits interact with each other constantly. Aggressiveness drives the pilot to stay in the fight and thus achieve more self-confidence; self-confidence drives the pilot to push the limits of himself and his plane, becoming more aggressive in the process.
To be an expert in fighter combat, a pilot must know how and when to engage the enemy. This instinct, an important part of overall situational awareness, can be trained. He also needs to know how to avoid being "painted" by an enemy's radar so he can enter his target area undetected and complete his mission. To accomplish this, he must understand the two different types of ground radar and how to avoid both. Finally, the pilot needs to know what the different formations are and how they affect a mission.
Tactics
This part describes modern jet air combat: Basic Fighter Maneuvers /one-versus-one air combat/ and Air Combat Tactics /one-versus-many air combat/. Also included are description of aspect angle and turn geometry, how to avoid a missile or SAM, and how to use directive commentary /giving instructions to your wingman/.
Radar avoidance
This part describes the two different types of ground radar: continuous wave/doppler and pulse-doppler. It also covers how to avoid being detected by these radars so you successfully complete your mission.
Formations
The final part deals with the various formations you can select when planning a mission. It shows what the different formations look like and gives description of how and when to use them for certain mission.
Tactics
The following is based on part of Pete "Boomer" Bonanni's upcoming book, Falcon Air Combat, published by Osborne/McGraw-Hill. Pete is a major in the U.S.Air National Guard and has flown F-4, A-7 and F-16 fighters. As of September 1991, he is stationed at MacDill AFB in Tampa, Florida, flying the F-16C.
Tactics background
The nature of air combat has remained the since Fokkers fought Spads in air power's World War I debut. The Red Baron himself summed it up when he said, "Rove your allotted area, find the enemy and shoot him down...... anything else is rubbish." These words, describing the ultimate goal of the fighter pilot, are ar true today as they were 75 years ago. While the nature of air combat has remained the same, the mechanics have undergone radical change. Most of this change, surprisingly, has come about in the last 10 years because high-thrust fighters such as the F-16 entered service in large numbers and expanded the combat maneuvering envelope.
The Basic Fighter Maneuvers /BFM/ that many generations of fighter pilots grew up with became obsolete with the introduction of the F-16 in the early 1980s. Fighter pilots had to change the way they thought about BFM in order to successfully employ the F-16. In the one-versus-one maneuvering environment, vertical out-of-plane maneuvers such as high yo-yos were rapidly replaced with in-plane turn circle BFM. The new maneuvers were perfected in the skies above the Nevada desert by the men of the F-16 Fighter Weapons School. In this next part, we will discuss these modern F-16 air combat maneuvers and provide you with the latest F-16 BFM techniques to help you build a solid academic foundation for performing BFM.
Basic Fighter Maneuvers /One-versus-One air combat/
BFM is the art of exchanging energy for aircraft position. Energy, in this discussion, means fighter speed and altitude. The goals of offensive maneuvering in the simulation or the real F-16 are to remain behind an adversary and to get in a position to shoot your weapons. In defensive maneuvering, you turn your jet and move the bandit out of position for shot on your aircraft. In head-on maneuvering, you get behind the bandit from a neutral position. When you execute maneuvers to accomplish any of these objectives, you invariably bleed off or expend energy. "Pulling Gs" and turning cause all aircraft to slow down or lose altitude /or both/. In this part, we will describe the geometry of the flight and the specific maneuvers needed to be successful air-to-air Falcon pilot.
BFM is flown in the future
Many discussions of BFM describe maneuvers as if they were cards or chess pieces played sequentially in a game of move and countermove. Modern aerial warfare, however, is more accurately compared to a wrestling match. It is a fluid contest of quick reactions with both opponents executing their moves in a blur. Aerial combat requires immediate reaction. Fighter pilot, as a rule, are not too bright on the ground; in the air, however, we are brilliant for very short periods of time. Within seconds, a pilot must constantly go through the following basic steps:
1. Observe the bandit.
2. Predict a future position in space for the bandit based on your observation.
3. Maneuver your jet in response to this prediction.
4. React to changes in the situation as you execute your maneuvers.
BFM is flown in the future and not in the present. You must constantly predict the bandit's future position /where he will be a few seconds from the time you observe him/ and fly your jet based on this prediction.
BFM geometry
In order to perform BFM, the pilot must understand his spatial relationship to the target from four perspectives: positional geometry, attack geometry, the weapons envelope, and the control zone.
Positional geometry
Range, aspect angle, and angle-off /also known as heading crossing angle or HCA/ are terms used to describe one aircraft's position relative to another. These conditions, shown below, define the angular relation between two aircraft. This angular relationship in turn tells you how much position advantage or sisadvantage you have.
* Range is the distance between your jet and the bandit.
* Aspect angle is the number of degrees measured from the tail of the target to your aircraft. Aspect angle is important because it tells you how far away you are in degrees from the target's stern, which is the desired position.
* Angle-off is the difference, measured in degrees, between your heading and the bandit's. This angle tells you relative fuselage alignment. For example, if the angle-off were 0 deg, you would be on a parallel heading with the bandit and your fuselages would be aligned; if the angle-off were 90 deg, your fuselage would be perpendicular to the bandit's.
Attack geometry
Attack geometry describes the path that an offensive fighter takes as he converges on the bandit. To start an attack on a bandit, there are three distinct paths or pursuit courses that you can follow: pure pursuit, lag pursuit, or lead pursuit.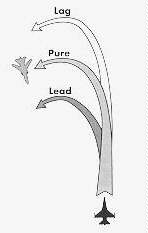
* If you are pointing directly at the bandit, you are flying a pure pursuit course.
* If you are pointing behind the bandit, you are in lag pursuit.
* If your nose is out in front of the bandit, you are in lead pursuit.
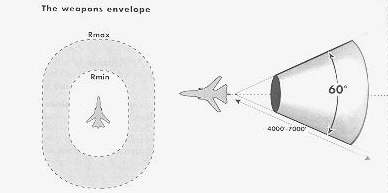
The weapons envelope
The weapons envelope is the area around the bandit where a missile or gun would connect. The envelope is defined by range, aspect angle, and angle-off; the dimensions and position are dictated by the type of weapons you are carrying. If your jet is loaded with all-aspect AIM-9M or AIM-120s, the weapons envelope around the bandit looks like the illustration above - a doughnut with the inside edge being minimum range /Rmin/ and the outside line being maximum range /Rmax/. If you are carrying a AIM-9P stern aspect missile, then the vulnerable area is shaped like a cone. These two missile envelopes are different because their seeker hears are based on different technologies. The AIM-9P's seeker head can only pick up the engine's IR energy from the rear of the target. The AIM-9M's seeker head can see the IR energy from all aspect or 360 deg.
The control zone
The control zone, also called the "elbow," is the place behind the bandit where you can establish a stable position from which to employ your weapons. Here, its relatively easy to remain behind the bandit and in control. Why "elbow"? Because fighter pilot describing air combat use their hands, and the elbow of the arm that is showing the bandit's motion is in the approximate position of the control zone. In F-16, this position is about 3,000 - 4,000 feet behind the maneuvering bandit when the bandit is at corner velocity. Corner velocity is the speed that an aircraft can turn the fastest, tightest turn; for bandit this speed is approximately 400 knots. As the bandit bleeds off energy and slows down, the control position gets closer to him. A 200 knot bandit cannot generate a very high turn rate so you can fly much closer to it and still stay in control.
BFM mechanics
All aircraft can execute only three basic maneuvers: roll, turn and accelerate. All other maneuvers are simply combinations of these. Roll is used to position your lift vector. The nose of the aircraft will turn in the direction of the lift vector once you put some Gs on the jet. Offensive BFM involves turning your jet to solve aspect, angle-off, and overtake problems created by the bandit's turn. Unfortunately, this is not an easy task. You must know precisely where and how to turn in order to solve these problems successfully and stay behind the bandit.
Turn rate and radius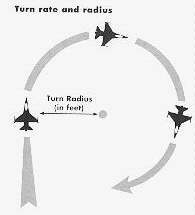
Two characteristics of a turning aircraft that a fighter must understand are turn radius and turn rate. Turn radius is simply a measure of how tightly your jet is turning. If you were looking down on the aircraft as it turned, turn radius would be the distance from the center of the turn circle to the aircraft, measured in feet.
The equation for turn radius is: TR=V2 /gG
V is the aircraft's velocity in feet/second. Little g is gravity and big G is the G force the aircraft is pulling.
It is not important to understand how to compute turn radius, but it is important to realize that velocity is squared in the equation and that the equation also includes aircraft Gs. The more Gs you pull, the tighter the turn.
Turn rate is another important characteristic of turning the jet. Turn rate tells how fast the aircraft is moving around the turn circle /how fast the plane is moving its nose/. Turn rate is measured in degees per second and is also dependent on Gs and airspeed.
Turn rate = K G/V
K is a constant, and big G and V are the same as in the equation for turn radius. This equation tells the fighter pilot that the most Gs can pull, at the lowest airspeed, gives him the best turn rate. Turn rate is very important in BFM because it measures how fast you can put your nose on the bandit. Since you have to put your nose on the bandit to shoot missiles or the gun, you need a fast turn rate.
You will never master BFM unless you can control your airspeed. A good overall combat airspeed is 400 - 450 knots. If you fly faster when you are trying to turn, your plane will have a very large turn radius and slow turn rate. If you fly slower than 400 knots, your turn radius will be small but your turn rate will go down because you can't achieve high Gs at a slow speed.
In an A-G configuration /with bombs or Mavericks loaded/ or in the presence of SAM's, you want to keep your speed up to at least 550 knots. If you start turning when you are loaded with bombs, you will soon bleed down your airspeed to the desired fighting speed of 400 - 450. If you are flying an air-to-air intercept and are going to turn and fight, then you should enter the "merge" /within visual range or WVR/ fight with your airspeed at 450 kts.
Acceleration
Acceleration is how fast you go faster. It is very important because BFM usually results in energy bleed off and a fighter must be able to regain this energy by acceleration. The best way to accelerate is to light the afterburner /AB/, roll the wings level with the horizon, and head for the ground in about 20 deg of dive.
Falcon offensive BFM
This part discusses specific offensive, defensive and head-on Falcon maneuvers.. In an air-to-air fight, you are forced to execute specific maneuvers in response to the bandit. In offensive maneuvering, BFM must be performed when the bandit turns into you and creates aspect, angle-off, and range problems. The BFM that you can actually execute in F-16 is constrained due to limits on what you can see in the simulation. The bandits in the simulation are difficult to see until they are at very close range. Outside 3,000 feet it is very difficult to tell what the bandit is doing and to judge the geometry of the fight. Because of this, most fights with the bandit result in a confusing "fur ball" of high speed passes and missile engagements at ranges greater than one mile. You know you did good when the bandit blows up, but you're not sure what happened or why. In this section, we discuss methods for going through the basic BFM steps: observe, predict, maneuver and react. We will also highlight some simulation "work arounds" that will help you execute the offensive BFM needed to win.
Flying to the elbow
Offensive BFM is necessary because a bandit in fear of dying will turn his jet at high Gs. To solve the BFM problems created by this turn, you must execute a turn of your own with the objective of flying your jet to the elbow. The key to F-16 offensive BFM is knowing when and how to execute this turn. If you are behind a bandit, remember the objective is to kill him and not put on an airshow at his 6o' clock. The first action to take when you have a bad guy in or near your HUD is to shoot something at him. If you can't shoot because the bandit starts a hard turn into you, then you must execute the following steps to get control of him and start shooting again.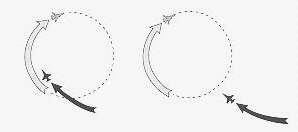
1. Use the HUD, the Radar Scope, and the Threat Indicator to observe the bandit. If you cannot determine the bandit's turn direction by looking out of the HUD, look at your Threat Indicator. There you will see the bandit moving around the circle, either right or left.
2. When you observe the direction of turn for the Bandit, predict his movement across the sky and start a turn in the same direction. For example if the bandit moves to the left in your HUD or on your Threat Indicator, you turn left.
3. When you see the bandit turning out in front of you, ask yourself this question: "If the bandit keeps turning at his present rate, will his nose come around to point at me before I can close with him?" If the answer is yes, you are outside the bandit's turn circle and you are not flying offensive BFM - you are flying head-on BFM. You cannot solve aspect, angle-off and range problems when you are outside the bandit's turn circle. The reason is simple: no matter what you do, if you are outside his turn circle, he can always point at you and force a head-on pass. The illustration above shows a Falcon both inside and outside the turn circle. For now, assume you are inside the bandit's turn circle /the bandit's present turn rate will not bring his nose around to point at your jet/.
4. From inside the turn circle, maneuver to place the Flight Path Maker out in front of the bandit /lead pursuit/, start pulling 5-7Gs, and adjust the airspeed to gain 50 knots of closure.
5. Now, you must observe the movement of the bandit in your HUD to determine how to react. The bandit will do one of three things in relation to your FPM.
* If the bandit stays in the same spot in the HUD, you are matching his turn rate and will close the range and fly to the elbow. Just keep doing what you're doing and prepare to strike a blow.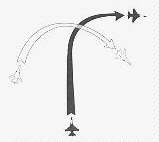
* If you pull the FPM to lead and the bandit moves rapidly across your HUD and back under your nose, ease off the G and let him fly back into view. In this case, you are pulling too much lead for the bandit's present turn rate. Once you regain a "tally ho" /visual sighting/, put the FPM behind the bandit in lag pursuit. When the range closes, the bandit will start moving away from you in the direction of the turn. When this occurs, pull the your nose back to lead pursuit and again get ready for a gun shot. In both of the above cases you may pass through Sidewinder parameters.
* If the bandit moves through the FPM and you go from lead to lag pursuit, you are not matching the bandit's turn rate and you will overshoot. An overshoot is when you fly past the bandit and are in danger of going out in front of him. The picture above shows a bird's eye view of an overshoot situation. The solution to this problem is to turn the Falcon as hard as possible and check your airspeed. If you are over 450 knots, you will overshoot the bandit every time - remember that velocity is squared in the rate and radius equations. If you do
overshoot, don't worry; keep turning in the direction of the bandit and you will get behind him.
All the above steps are designed to get you to the elbow of the bandit. You must be aware of your airspeed and closure at all times when flying these maneuvers. In the F-16, we have a saying: " Fight BFM with both hands." This means that you must not only move the stick but also the throttle when you are fighting. Failure to do so - in either the real jet - will send you riding that big thrust engine right on past the bandit into a gross overshoot.
If you are an experienced simulator pilot or a non-F-16 fighter pilot, you will notice that our discussion of offensive BFM did not have a single word about high yo-yos or any other out-of-plane maneuvering. In the F-16, you can kill the bandit faster and stay out of trouble longer if you only fly lead, pure, or lag pursuit as described above.
Falcon defensive BFM
You are not sure what went wrong, but there he is - a blood-hungry National Socialist at your 6 o'clock. Before you reach for the ejection handle, let's discuss your options. Defensive BFM is a very easy concept to grasp in the F-16. A will to survive is the most essential ingredient needed. The geometry of the defensive fight is very simple, and the maneuvers are equally straightforward. You must be able to execute them, however, while you are under pressure and enduring the physical duress of violent, high-G maneuvering. Defensive maneuvering requires patience, stamina and optimism. Keep asking yourself, "Self, am I still alive?" If the answer is "yes" - keep fighting.
Maneuver and ECM
The first thing you need to do defensively is to create BFM problems for the bandit. You know how difficult it is to stay behind a hard-turning bandit; to give the enemy the same trouble you had, execute the following procedures for these defensive situations:
Missile Launch: Pay close attention to the Threat Indicator; if you see or hear a missile launch indication at any time, stop what you are doing and execute the following procedures:
1. Dispense chaff and flares and turn on your jamming pod /ALQ-131/ if you have one.
Don't try to figure out which type of missile the enemy is firing /radar or IR/. You will have plenty of time to ponder that in POW camp if your defensive reactions don't work.
2. While you are using your countermeasures, you must also put maximum Gs on your jet as quickly as possible to give the enemy missile a difficult target. Again, don't sweat which way to turn; just do it.
If you get a lock-on indication before you get a launch, dispense chaff only and turn the pod on. In this case, you have more time to maneuver the jet against the bandit.
Bandit on your six: When the bandit is at your 6 o'clock and you get a lock-on indication or no indication, look at the Threat Indicator to figure out the direction of your defensive turn. Then execute the following steps:
1. If the bandit is on the right side of the scope, turn right; if he is on the left, turn left. In the rare instance when you actually can see the bandit, turn towards him.
2. Roll to set your wings at approximately 80-90deg of bank and start a hard turn into the bandit at maximum G. Turn with as much G as the jet will give you.
3. Next, look at the Threat Indicator and note the direction of movement of the bandit.
* If the bandit is approaching your 12 o'clock position, your turn is working. You are giving him a problem he can't solve, and he is moving out in front of you. Keep turning until he gets to your nose and your radar locks on. Then you are no longer on the defensive but are probably flying offensive or head-on BFM.
* If you turn hard into the bandit and he does not move to the 12 o'clock position on the Threat Indicator, you are in for a real tussle. First check your airspeed. If you are flying faster than 450 knots, slow down to give your jet a tighter turn circle. If you are slower than 350 knots and you are not in AB, get there. This might get you airspeed up to 450. If it doesn't and you still have external stores on the jet, jettison them.
Hopefully, one of the above steps will solve your problem and put the bandit moving near the 12 o'clock position on the Threat Indicator. If not, these is nothing more you can do except keep turning and hope he runs out of gas or makes a mistake. I wish I could give you a "magic move" that would put the bandit out in front of you, but unfortunately that move doesn't exit. Just remember that a MiG at 6 o'clock is better than no MiG at all to a confident and aggressive fighter pilot.
Falcon head-on BFM
This BFM is flown after passing the bandit head-on. At this point, you could keep going away from the bandit or you could turn and "duke it out" with him. Head-on BFM is very easy to execute but difficult to understand. The following steps will help you take a head-on situation and convert it into an offensive one.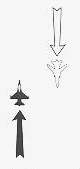
1. Use the Threat Indicator, the HUD and the Radar Scope to point at the bandit. The goal is to place him at your 12 o'clock position.
2. When you get an in range /IN RNG/ indication in the HUD, shoot a Sidewinder. If the Sidewinder doesn't work, switch to guns and shoot when you get inside two miles.
3. Stay heads up for a missile launch indication on your Threat Indicator as the bandit approaches. If you get a launch indication, respond as described in the defensive BFM section. There should be no doubt in your mind that when somebody shoots at you, you're defensive.
4. When you see the bandit fly past you or the Threat Indicator shows the bandit moving toward your 6 o'clock, start a hard turn at 5-7 Gs in the direction of the bandit.
5. After starting a hard turn into the bandit, keep the turn coming until you get the bandit in your HUD again. At this time, analyze the aspect angle. If it is high /above 120 deg/, you are still in a head-on fight. Go back to step one. If the aspect angle is medium or low, you are winning the manly contest of head-on BFM. Just keep pulling hard in the direction of the bandit and you will soon be behind it.
6. Anytime you get confused, remember this: always turn in the direction of the bandit. If you can't think of anything else to do, just keep turning into him, using the Threat Indicator as a reference.
One last point about head-on BFM: you can execute a hard turn into the bandit in the vertical plane as well as the horizontal. If you go into the vertical, just remember to keep on pulling all the way through until you are pointing at him again. In an F-16 you should always drive the fight into a tight, high G circle because you can get around that circle faster than any other jet in the sky.
The goal of maneuvering in offensive, defensive and head-on situations is the same: to survive the attack of the bandit and shoot him down. To do this you need weapons.
Why fighter pilots were born
Flying BFM or 1-versus-1 air combat in the F-16 is a wonderful thing! The F-16 is a small, highly maneuverable fighter that can dominate most other jets in a fight. You must be aware, however, that maneuvering at high Gs to get to the bandit's 6 o'clock is not the objective of the fight. Fighter pilot were born to kill the enemy and to survive. To kill the enemy, you must use your weapons. The best air-to-air engagements are brutal ambushes of the enemy. One minute the bandit is flying along nice and relaxed - the next minute your missile hits him and his body parts are flying formation with pieces of his jet. A sustained maneuvering fight can be very unhealthy in modern aerial combat. As you go around and around with the bandit, other pilots are attracted to the fight like moths to a flame. You may be winning the fight you are aware of while you are losing a fight you don't even know you're in. For this reason, you should shoot every time you get in parameters on the enemy and end the fight quickly. The life you save will be yours.
Air Combat Tactics /ACT/
ACT are used when more than two aircraft engage. All ACT is built on BFM tactics; the bottom-line in ACT is always to use your best 1-versus-1 tactics first - before you consider the other aircraft in the fight. For example, once you make a decision to kill a bandit out in front of you, fight your best 1-versus-1 offensive BFM to kill him - regardless of how many other bandits are in the area or what your wingman doing. The crucial parts of this example are making the decision to engage and deciding how long to stay in a turning fight. Trying to kill that bandit may be suicide if the air is filled with enemy jets and the engagements requires you to be anchored in a sustained turning flight. On the other hand, offensive BFM may require that you turn for only a few degrees to get a kill. The point is that ACT involves tactical decision. Once keep in mind that ACT is only an extension of single ship BFM.
One-versus-many
Single ship combat against multiple enemy aircraft is one of the most challenging air-to-air engagements a fighter pilot will ever face. One-versus-many tactics are difficult to execute but straightforward conceptually. We will discussion of one-versus-many tactics into offensive, defensive, and head-on situation.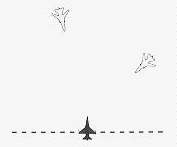
* You are on the offensive in 1-vs-many situation if the bandits you are fighting are all out in front of your aircraft. Keeping the bandits out in front is the difficult part. It is important to shoot as soon as possible at the nearest bandit and then maneuver to stay in control of the fight. If you shoot a missile at the nearest bandit and hit him, you improve the odds and change the mind-set of the surviving enemy fighters. If you miss your shot, then the maneuvering is even more critical because you have angered them and they still outnumber you.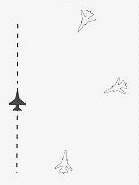
* A rule-of-thumb for maintaining control of the fight is to keep the bandits on one side of your jet. This makes it much easier to keep the bandits in sight and makes it harder for them to sandwich you. In addition, you should also try to keep all of the bandits either above or below you in altitude to make it easier to keep track of the bandits and keep you from getting trapped.
* The question may come up: "What do I do if there are more than two bandits in a fight and I do not kill one before they all see me and start a turning engagement?" The answer is simple - separate from the fight. The way to do this is to pass the bandits as close as possible at 180deg of heading crossing angle at the speed of heat.
*A rule-of-thumb is that if you are alone and there are more than two bandits, do not turn more than 90deg to get a shot and do not let your airspeed bleed off below 400 knots. After 90deg of turn or when you are reaching 400 knots, get out of the fight. Separating from fights is an art more than a science, and it is a critical fighter pilot's skill.
* A defensive 1-vs-many fight starts when a bandit gets behind your 3/9 line with nose position. Remember, bad stuff can happen to you when the bandit puts his nose on your within range of his weapons! When this occurs, fight your best 1-vs-many defensive BFM. It makes no difference how many bandits are in the sky around you; the rule-of-thumb on defense is to fight 1-vs-1 BFM against the most immediate threat. When you have defeated this attack, you will probably have another bad guy saddling up on you so get ready to fight the next one. When you are fighting multiple bandits, remember that one may leave you in order to give the change to kill you to another one who is in better position. If you see one bandit disengaging, keep checking six because you may be about to be engaged by his wingman. If this does not occur, then keep accelerating and separate from the area.
* A head-on 1-vs-many fight has a very simple scenario. If you pass multiple bandits head-on, plug in the afterburner and keep on going. It is very foolhardy to start a 1-vs-many fight from a head-on pass. In fact, the only way you should initiate a 1-vs-many fight is from an offensive position.
Two-versus-many
2-vs-many fights are conceptually very similar to 1-vs-many engagements. The difference is that your wingman can even up the odds and give you several additional options that you do not have single-ship. The presence of a wingman, however, does not mean abandoning the principles of 1-vs-many air combat. Your wingman could be blown up or engaged by a SAM, and you'd be in a bad position. For this reason, always fight your best 1-vs-1 BFM and follow the rules for 1-vs-many that we discussed. The biggest advantage of having a wingman is that you can stay in a turning fight longer to achieve a kill.
This does not mean that you can disregard your "escape window". The presence of a wingman does mean. However, that you can delay a separation and spend more energy in the form of airspeed and altitude because your wingman can pick off any other bandits that try to enter the fight. Just remember: in 2-vs-many fights your wingman will probably become engaged soon after the merge, and you will be thrust suddenly into a 1-vs-many fight.
Directive commentary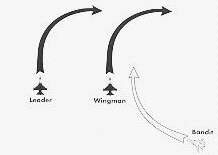
Break left/right: A break turn is a maximum G turn into a attacking bandit. It is performed to keep an enemy fighter off your back. You would direct your wingman to "break" if you detected a bandit at his 6 o'clock closing into a firing position or if a missile is in the air.
Break high/low: This is the same except it is in the vertical. Use it if a bandit is coming from high or low.
Roll out and fly straight and level: Use this directive when you notice that your wingman is starting to do something that does not fit into your current scheme of maneuver.
Bypass the current waypoint: This will tell your wingman and the rest of the fighters in your flight to skip the current waypoint and head for the next one.
Return to provious waypoint: This is opposite of the last command. All the aircraft on your flight will start to head back to the last waypoint you reached.
Maintain radio silence: If you want your wingman /and others in your flight/ to shut up when you're engaged in a dogfight, you can tell them to keep radio silence. This works two ways, however. You won't be able to hear their cries for help, but by the same token you won't get their warning messages, either.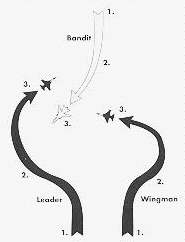
Execute the right/left arm of a bracket: A bracket is a pincer move used by fighters to intercept a bandit formation from two sides and is usually executed outside of 15 miles. The idea of a bracket is to give the bandit two choices - both of which are lethal. Be advised that when you execute a bracket, you will lose a visual on your wingman. Another thing to keep in mind during a bracket is that you should not attempt a bracket if the aspect is less than 160deg at 20 miles. If you try at a lower target aspect, one arm of your bracket will not get outside the bandit.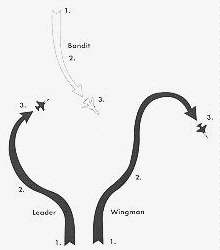
Drag left/right: The drag command /also called a "pump" by fighter pilot/ is used to decoy the enemy and have him engage a fighter which is leaving the fight. Normally this is done so that another fighter can get an easy shot at an enemy formation. The above figure shows a drag maneuver. There is one very important thing to remember about a drag: It must be initiated before you get within 10 miles of the bandit. If you try to drag inside this range, you risk getting speared with an enemy medium range missile.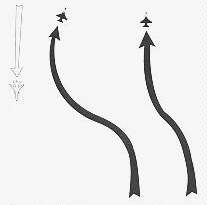
Disengage: The disengage command is used when you want to "get out of Dodge." I you see your escape window closing down and you want to separate from the fight, you can direct your wingman to separate using the disengage command. The figure above shows a situation where this might occur.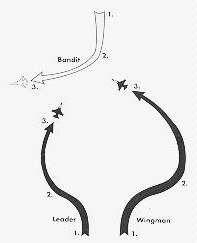
Engage: When you direct your wingman to engage, you are asking him to enter a turning fight with the closest bandit.
Radar avoidance
This part of the AFT section will go into detail on the two types of ground radar /continuous wave/doppler and pulse-doppler/. Each of the two kinds of radar have their flaws in that you can fool them into thinking that you are just another part of the landscape.
Radar types
Radar stands for Radio Detection And Ranging. A radar transmitter puts out either a beam or a series of pulses of radio energy. The transmitter antenna itself or a separate antenna can be used as a receiver to detect the beam or pulse coming back, which it does if it hits a solid object. Since radio waves always travel at the same speed, timing the reception of the return tells the receiver how far away the reflecting object was when the beam hi it. Modern radars are very discriminating, capable of telling both size and basic shape of an object by its radar return.
Continuous wave / doppler
A continuous wave/doppler radar puts out a constant signal. You need a second antenna to act as a receiver, since the transmitter cannot receive while it is transmitting. This form of radar was the first type built and nowadays is mostly used for doppler-effect ranging, using the doppler effect of the beam bouncing off object moving toward or away from the receiver. If an object does not show movement toward or away from the radar emitter, the radar does not display it.
The probability of being picked up by a doppler radar depends on the plane's angle to the radar and, of course, on the power and range of the doppler radar. If an aircraft turns 90deg to the beam of the doppler radar, it makes as little doppler-shift return as possible and the radar does not note any difference. This technique is called "beaming" the radar. The more powerful or close the doppler is, the more likely it is to catch slight variations in the position of the plane and realize it is moving.
Pulse-doppler radar
Pulse-doppler radar puts out its radio beam in pulses, rather than a continuous beam, and uses a separate receiver to measure the radio pulse return. Most radars use pulses instead of a continuous beam because it is cheaper and less cumbersome to use the same antenna as transmitter and receiver. A radio pulse is issued, and the same device attempts to pick up any return on the beam caused by it bouncing off a solid object.
As a rule, pulse-doppler radar is shorter ranged and less efficient than doppler radar. It shows everything the radar beam bounces off of, making for a lot of "snow" on the screen. The best way to fool pulse-doppler radar is to "charge" it head-on to make the smallest target for the beam to pick up and blend in the rest of the static.
Determining types of radar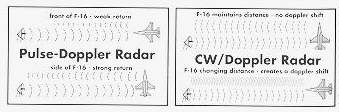
You can tell what kind of radar is in the area by looking on your Threat Indicator. Following is a graphic of the different types of radar.
Multiple radar signals
Common practice among nations who have both forms of radar is to alternate them and overlap their coverage areas, so that a plane coming head-on to pulse-doppler radar will be detected by a continuous wave radar and vice-versa. However, radars cannot be placed too close to one another because their signals interfere with each other. Also, radar systems are very expensive items - crowding them too close together in one area may mean not enough radar coverage in another. Therefore, it is possible for a clever pilot to wave between radars, alternating a head-on approach and a 90deg approach depending on which radar signal is stronger. This is something referred to as "threading the needle."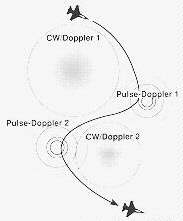
Various devices such as chaff and an ECM pod also can confuse radar, though the radar receiver will know that something is up there or the interference would not exist.
Other methods of avoiding radar
Terrain masking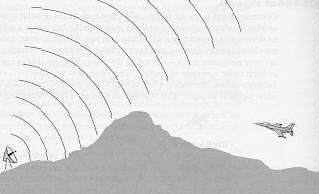
Since radar waves travel in lines, large ground object and mountains will generally obscure a radar's signal. Therefore, if you pick up a radar signal behind a hill, you can drop altitude to a point below the peak of the hill, this masking your radar signature. This is a useful technique to approach a radar installation undetected and for breaking a radar's lock on your aircraft.
"Nap-of-the-earth" /NOE/ flying
The other way to hide yourself from a radar broadcast is to fly as low to the ground as possible. This is called "nap-of-the-earth" or NOE flying. When you fly extremely low to the ground, a radar may get confused and think that you are part of the landscape. While NOE flying is quite effective in avoiding radar, its disadvantage is that it makes your plane very vulnerable to AAA and small arms fire from ground troops.
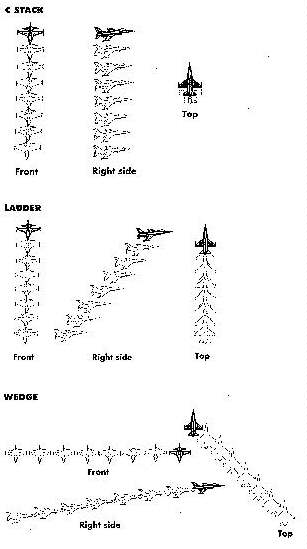
Formations
Each of these formations are arranged in an eight-plane formation. Keep in mind that the aircraft in black is Plane #1 /your plane/, while the aircraft in gray are the other ones in your flight.
Some of these formations are more useful than others because they may confuse enemy radar into thinking that your formation has fewer planes than you actually have. In addition, other formations may be useful for air-to-air encounters while others may have more merit in a ground attack situation.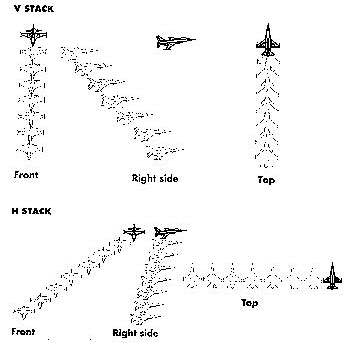

 .
.
Advanced Fighter Tactics Introduction |